TL;DR:
- Storage container customization transforms standard steel boxes into functional workspaces, secure storage, or mobile units through structural, mechanical, and aesthetic modifications. Key upgrades include door configurations, insulation, climate control, interior shelving, and exterior finishes, all tailored to specific use cases for cost-effective results. Proper planning, site preparation, and clear use-case documentation ensure long-term durability, efficiency, and aesthetic appeal for any container project.
Storage container customization options are the specific structural, mechanical, and aesthetic modifications that transform a standard steel box into a purpose-built workspace, secure storage unit, or mobile facility. Modified containers now serve as flexible workspace extensions across industries from construction to retail, and demand for these modifications keeps growing as businesses prioritize material reuse and sustainability. Whether you need a climate-controlled archive room, a branded pop-up kiosk, or a secure tool depot on a job site, the right combination of custom storage container designs determines whether your container works for you or against you. This guide covers every major modification category, with cost context and planning advice to help you make decisions that hold up long-term.
1. Storage container customization options for doors and access
Door configuration is the single most impactful modification you can make to a container. The standard double cargo doors at one end work fine for occasional access, but they become a bottleneck the moment you need frequent entry or want to move people rather than pallets.
The main door types available for container modifications include:
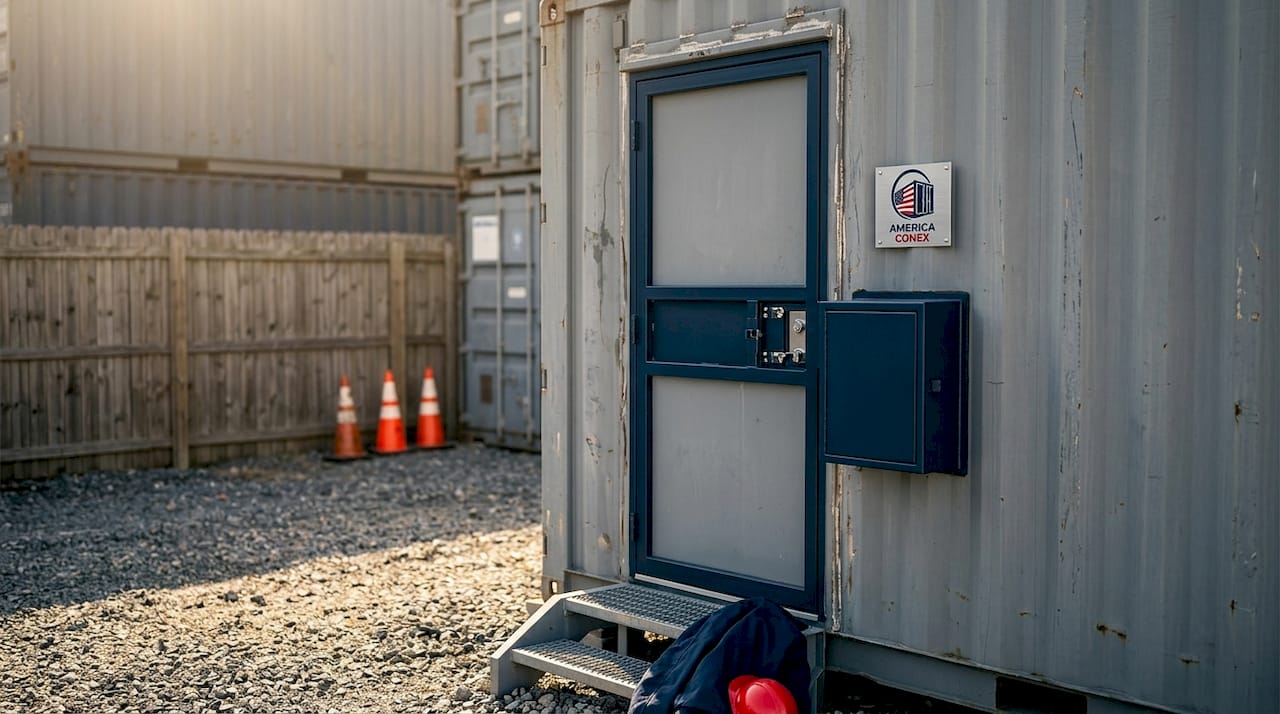
- Personnel doors: Standard 36-inch swing doors installed on the side or end wall, ideal for workshops, offices, and retail kiosks where people walk in and out throughout the day
- Roll-up doors: Overhead doors that preserve floor space and allow forklift or pallet jack access without swinging clearance requirements
- Double-wide cargo doors: Replacement or additional sets of the original doors, useful when loading oversized equipment
- Ramps and loading docks: Bolt-on or welded ramps that eliminate the step-up at the container threshold, critical for wheeled equipment and accessibility compliance
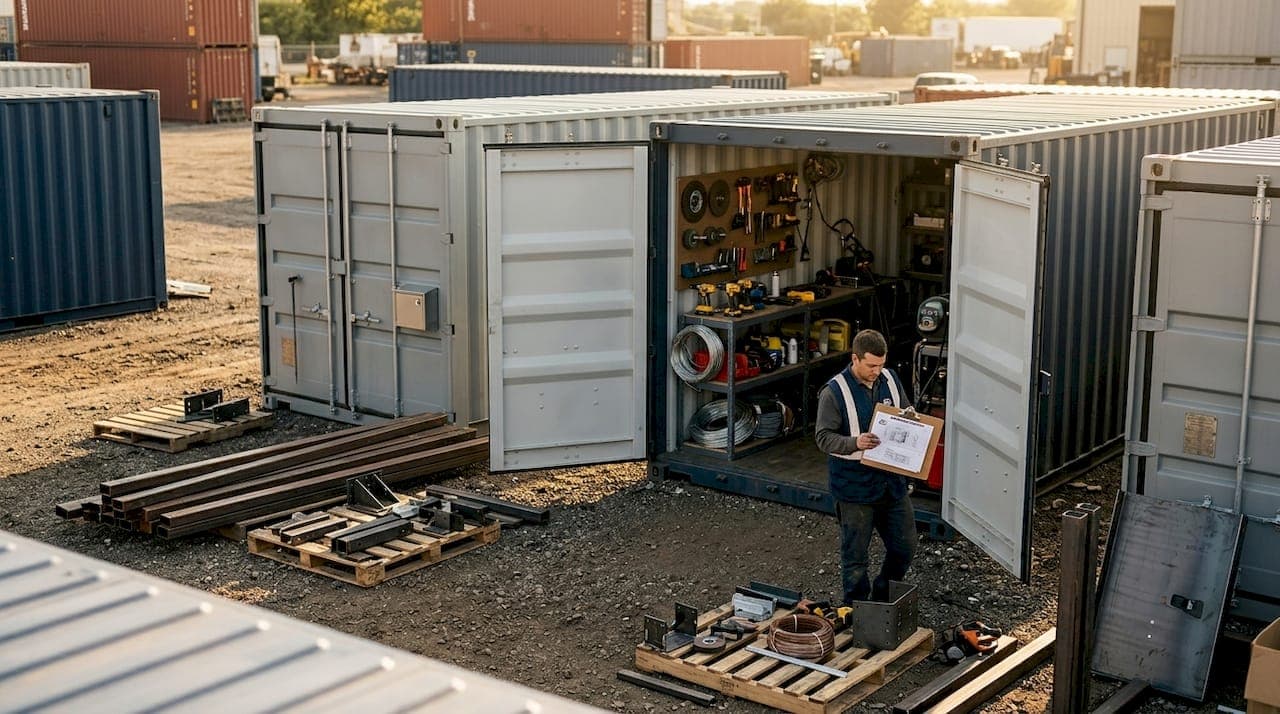
Personnel doors and lock boxes are among the most requested modifications because they balance daily accessibility with security. A lockbox is a steel shroud welded over the door handle and padlock, making it nearly impossible to cut the lock with bolt cutters. For job sites and overnight storage, this addition costs very little but significantly raises the barrier to forced entry.
Pro Tip: Choose your door type based on what moves through the opening most often. If people enter dozens of times per day, a personnel door with a push-bar latch saves time and reduces wear. If you load pallets weekly, a roll-up door is worth the added cost.
Door placement also affects structural integrity. Cutting openings in the side wall requires adding a steel header frame to redistribute load. Any modification shop worth hiring will include this reinforcement automatically, but always confirm it is part of the quote.
2. Climate control and insulation to improve usability
Insulation is the modification that separates a basic storage box from a livable or workable space. Without it, interior temperatures in direct sun can exceed 140°F in summer and drop below freezing in winter. For sensitive inventory, electronics, or any occupied workspace, that range is unacceptable.
The main climate control options for containers include:
- Closed-cell spray foam insulation: The most popular choice for container interiors because it bonds directly to the steel walls, adds structural rigidity, and provides a vapor barrier. Typical R-values range from R-13 to R-25 depending on thickness.
- Rigid foam board panels: A lower-cost alternative installed over a wood or metal stud frame. Easier to remove or modify later but leaves more condensation risk at seams.
- Mini-split HVAC systems: Ductless units from brands like Mitsubishi Electric or LG are the standard choice for container offices and workshops. They heat and cool efficiently in small spaces and require only a small penetration through the wall for the refrigerant line.
- Louvered vents and turbine ventilators: For storage-only containers where full HVAC is not justified, passive ventilation reduces moisture buildup and prevents rust on stored goods.
Insulation costs start around $5,400 for a fully insulated 20-foot container, which reflects the labor-intensive nature of spray foam application. That figure is the threshold where you need to honestly assess whether the container will be occupied or used for temperature-sensitive goods. If neither applies, skip it and invest in ventilation instead.
Energy use is a real consideration for HVAC in containers. The steel shell conducts heat aggressively, so undersizing a mini-split unit leads to high electricity bills and equipment strain. Always size the unit for the container's cubic footage plus a 20% buffer for solar heat gain through the roof.
3. Interior organization: shelving, partitions, and flooring
The interior of a standard container is an empty rectangle. That is either a blank canvas or a wasted opportunity, depending on how you approach it. Thoughtful interior customization turns that space into an organized, efficient environment.
Shelving options for container interiors include:
- Welded steel shelving: Permanent and load-bearing, ideal for tool storage, parts inventory, or archive boxes. Typically runs floor to ceiling along one or both side walls.
- Modular bolt-together shelving: Systems from manufacturers like Edsal or Husky allow reconfiguration as needs change. Better for businesses whose inventory mix shifts seasonally.
- Wood overlay shelving: Lower cost and easier to install, suitable for lighter loads and retail display applications.
Partition walls and shelving coverage of 30 to 50 percent of the interior is common in workshop and inventory containers. Partitions create distinct zones, such as a clean office area separated from a dirty tool storage area, without requiring two separate containers.
Flooring upgrades matter more than most buyers anticipate. The original container floor is 28mm marine-grade plywood over steel crossmembers, treated with pesticides for international shipping compliance. For food prep, medical storage, or any application where that treatment is a concern, replacing or covering the floor is non-negotiable. Options include:
- Anti-slip rubber matting for workshops
- Epoxy coatings for clean rooms and food prep areas
- Vinyl plank flooring for office and retail spaces
- Reinforced steel diamond plate for heavy equipment storage
Pro Tip: Before ordering shelving, map out your workflow inside the container on paper. The most common mistake is installing shelving on both side walls and then realizing there is no room to open a large equipment case or maneuver a hand truck.
4. Exterior aesthetics and protective finishes
A bare steel container weathers well but looks industrial. For residential properties, retail locations, or any setting where appearance matters, exterior modifications make a significant difference in how the container is received by neighbors, customers, or local permit authorities.
| Exterior modification | Approximate cost | Lifespan | Best use case |
|---|---|---|---|
| Industrial paint (marine-grade) | $800 to $2,500 | 10 to 15 years | Job sites, general storage |
| Vinyl wrap or branded decals | $1,200 to $3,500 | 5 to 7 years | Retail kiosks, marketing |
| Cedar or wood cladding | $3,200 to $6,800 | 15 to 25 years | Residential, hospitality |
| Roofing kit (pitched roof) | Around $5,790 | 20 to 40 years | Permanent installations |
Marine-grade industrial coatings are the baseline for any container that will sit outdoors for years. Standard factory paint chips and rusts within three to five years in coastal or high-humidity environments. A proper two-coat epoxy primer plus polyurethane topcoat extends that to a decade or more.
Cedar cladding is the most visually transformative option. It wraps the container in horizontal wood boards, making it look like a modern outbuilding rather than a shipping container. The cost reflects both material and labor, since the cladding requires a steel or wood subframe attached to the container walls before boards are applied.
Roofing kits add a pitched roof structure over the flat container top, which solves two problems at once. They shed rainwater and snow load more effectively than the flat roof, and they create an attic-like air gap that reduces heat transfer into the container interior.
5. Planning and budgeting for your container project
Every successful container modification project starts with a use-case audit before a single cut is made. A detailed upfront audit shapes all major customization decisions including electrical load requirements, insulation type, door orientation, and interior layout. Skipping this step is the primary reason projects run over budget.
Site preparation is the most underestimated cost in container projects. Placing a container directly on soft ground causes settling and warping within months, which stresses the frame and throws doors out of alignment. The correct foundation is a compacted gravel pad with corner blocks or concrete footings at each corner. Budget $500 to $2,000 for site prep depending on ground conditions and container size.
Container grade selection directly affects your total project cost. Cargo Worthy containers offer cleaner surfaces for aesthetic modifications compared to Wind and Water Tight units, which may have significant surface rust requiring grinding and priming before paint or cladding can be applied. Choosing the wrong grade adds unexpected prep expenses that can run into the hundreds of dollars before modification work even begins. Americaconex offers all three grades, including one-trip containers in like-new condition, which are the cleanest starting point for high-finish projects.
Basic turnkey container setups range from $2,400 to $11,200 depending on size and modification level. That range covers a lightly modified 20-foot unit at the low end and a fully insulated, electrically wired 40-foot high cube at the upper end. Use this as your baseline when building a budget, then add line items for each specific modification.
Pro Tip: Get quotes for the container and the modifications separately. Some suppliers bundle everything and mark up the modification costs significantly. Knowing the standalone container price from a supplier like Americaconex gives you a benchmark to evaluate bundled quotes fairly.
For long-term cost management, factor in maintenance from the start. A container with marine-grade paint and a roofing kit will cost more upfront but require far less maintenance over a ten-year period than a bare unit repainted every few years.
Key takeaways
Matching your storage container customization options to a clearly defined use case is the single most reliable way to control costs and get a functional result.
| Point | Details |
|---|---|
| Start with a use-case audit | Define electrical, insulation, door, and layout needs before ordering any modifications. |
| Site prep prevents costly damage | A compacted gravel pad with corner blocks protects the container frame and keeps doors aligned. |
| Container grade affects total cost | Cargo Worthy and one-trip units require less surface prep before painting or cladding. |
| Climate control requires proper sizing | Undersized HVAC in a steel container leads to high energy costs and equipment failure. |
| Budget $2,400 to $11,200 for turnkey setups | Use this range as a baseline and add specific modification costs as line items. |
What I've learned from watching container projects go right and wrong
After seeing hundreds of container modification projects, the pattern is consistent. The ones that succeed share one trait: the buyer had a specific, documented use case before they called anyone. The ones that struggle share a different trait: the buyer started with a vague idea and made decisions reactively as the project progressed.
The most common mistake I see is underestimating site preparation. People budget carefully for doors, insulation, and paint, then balk at spending $800 on a gravel pad. Six months later, the doors won't close properly because the container has settled unevenly. That repair costs more than the pad would have.
The second most common mistake is over-specifying modifications for a use case that doesn't require them. A contractor who needs secure tool storage on a job site does not need spray foam insulation and a mini-split. A personnel door, a lockbox, and interior shelving solve the problem for a fraction of the cost. Matching modifications to real needs avoids overbuilding and keeps projects cost-effective.
My honest advice: spend 30 minutes writing down exactly how you will use the container on a typical day, what goes in and out, who accesses it, and what environmental conditions it will face. That document will make every subsequent decision faster and cheaper. It will also make your conversations with modification suppliers far more productive, because you are giving them a brief rather than asking them to guess.
— Alex
How Americaconex supports your container customization project
Americaconex supplies new and used shipping containers nationwide, with access to 30+ depot locations for fast, reliable delivery across the United States. Whether you are starting with a used Wind and Water Tight unit for basic storage or a one-trip container as the foundation for a high-finish workspace, Americaconex has the right grade and container dimensions for your project. You can review all available container grades to match your modification plans to the right starting point. From 20-foot standard units to 40-foot high cubes, Americaconex delivers the container and the expertise to help your project start on solid ground. Explore the full range of containers for sale and get pricing that reflects your actual needs.
FAQ
What are the most popular storage container customization options?
The most requested modifications are personnel doors, lockboxes, insulation, HVAC systems, interior shelving, and exterior paint or cladding. Door and access upgrades are typically the first priority because they directly affect daily usability and security.
How much does it cost to customize a storage container?
Basic turnkey setups range from $2,400 to $11,200 depending on container size and modification level. Individual upgrades like cedar cladding add $3,200 to $6,800, while insulation starts around $5,400 for a fully treated 20-foot unit.
What container grade is best for modifications?
Cargo Worthy and one-trip containers are the best starting points for aesthetic modifications because their surfaces require less prep work before painting or cladding. Wind and Water Tight containers may need additional grinding and priming, which adds cost.
Do I need site preparation before placing a modified container?
Yes. Placing a container directly on soft or uneven ground causes settling and frame warping that throws doors out of alignment. A compacted gravel pad with corner blocks at each corner is the standard foundation for any permanent or semi-permanent container placement.
Can I add electrical and HVAC to a storage container?
A container can be wired for standard 120V or 240V electrical service and fitted with a ductless mini-split HVAC system. The upfront use-case audit should define the electrical load requirements so the panel and wiring are sized correctly from the start.